Create a Local Ilum Cluster for Spark Development
A step-by-step guide on how to deploy a local development cluster in Ilum.
Why Create a Local Ilum Cluster?
Ilum enables multi-cluster architecture management from a single central control plane, automating complex configurations. You only need to register your cluster in Ilum and configure basic networking. To learn more about cluster management concepts in Ilum, read the architecture overview.
This guide covers the creation of a local cluster—a simulation environment launched inside the ilum-core server. This is ideal for testing Ilum's cluster management capabilities without requiring external Kubernetes infrastructure.
डेमो
यहां आप इलम में स्थानीय क्लस्टर जोड़ने के तरीके पर एक डेमो देख सकते हैं पूर्ण स्क्रीन में गाइड
Step-by-Step Deployment Guide
Step 1: Navigate to Cluster Creation
- के पास जाओ क्लस्टर्स section in the Workload menu.
- पर क्लिक करें नया क्लस्टर घुंडी।
Step 2: Configure General Settings
- Name & Description: Choose a descriptive name and description to help your team understand the cluster's purpose.
- Cluster Type: Set the cluster type to स्थानीय.
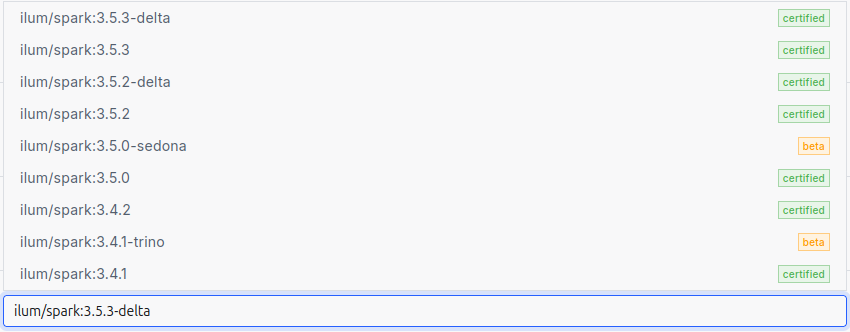
- Spark Version: Select the appropriate Spark image version.
The Spark version is defined by the container image used for Spark jobs. Ilum uses optimized images with pre-installed dependencies.
Here is a list of available Spark images:
Step 3: Define Spark Configurations
Any Spark configurations specified at the cluster level will be automatically applied to every job deployed on that cluster.
Why use this? It eliminates repetitive configuration. For instance, if you use अपाचे आइसबर्ग as your Spark catalog, you can configure it once globally here. All Ilum jobs on this cluster will inherit these settings.
Step 4: Integrate Object Storage (S3/MinIO)
Ilum uses a default cluster storage to manage job files (both user code and Ilum internal artifacts). You can connect various storage providers: S3, GCS, WASBS, or HDFS.
In this guide, we will configure an S3 bucket using the मिनियो storage that comes deployed by default with the Ilum cluster.
- पर क्लिक करें "भंडारण जोड़ें" घुंडी।
- Name & Type: Specify a name and select एस 3 as the storage type.
- स्पार्क बाल्टी: करने के लिए सेट करें
इलम फ़ाइलें. This is the main bucket for Ilum Job files (default in the local MinIO). - डेटा बकेट: करने के लिए सेट करें
इलम फ़ाइलें. This is required for using इलम टेबल्स (Spark format). - Endpoint & Credentials:
- Endpoint:
एलम-मिनी: 9000 - Access Key:
मिनीएडमिन - Secret Key:
मिनीएडमिन(These are the default credentials for the internal MinIO instance.)
- Endpoint:
- Click the "सबमिट करें" घुंडी।
You can add multiple storage backends; Ilum Jobs will be configured to interact with all of them.
Step 5: Finalize Local Cluster Resources
Navigate to the local cluster configurations. Here, use the slider to allocate the number of Java threads used for the local cluster simulation.
Finally, click the जमा करें button to create your cluster.
Step 6: Verify Deployment with a Test Job
To ensure your local cluster is functioning correctly, create and run a simple Spark job.
- Navigate to Cluster: Go to the क्लस्टर्स section and select your new local cluster.
- Create Service: Click New Service. Enter a name and select कोड as the type.
- Launch Editor: Find your new service in the list and click अमल.
- Run Spark Code: In the code panel, paste the following Scala code.
This script creates a simple DataFrame and writes it to the S3 storage we configured earlier.
// 1. Create sample data
val डाटा = Seq(("Alice", 29), ("Bob", 35), ("Cathy", 23))

// 2. Convert to DataFrame with defined columns
val लोमो = उत्तेजक गुण.createDataFrame(डाटा).toDF("नाम", "age")

// 3. Define output path (pointing to our MinIO bucket)
val s3Path = "s3a://ilum-files/output"

// 4. Write data to S3 in CSV format
लोमो.लिखना.format("csv").मोड समूह("अधिलेखन").save(s3Path)
- क्लिक करना अमल.
If the job completes successfully, your local Ilum cluster is correctly configured and ready for development!