Ilum में JupyterHub
Enterprise Feature: JupyterHub is an enterprise feature in Ilum and requires a valid enterprise license to function. It will not work with the standard open-source license.
विषय-सूची
- विहंगावलोकन
- स्थापत्यशैली
- LDAP प्रमाणीकरण और प्राधिकरण
- Gitea एकीकरण (संस्करण-नियंत्रित नोटबुक)
- हेल्म के माध्यम से JupyterHub को तैनात करना (कॉन्फ़िगरेशन और रहस्य)
- JupyterHub के अंदर Gitea ऑपरेटर (DevOps विवरण)
- उपयोगकर्ताओं के लिए पहली बार लॉगिन गाइड
विहंगावलोकन
Ilum में JupyterHub एक बहु-उपयोगकर्ता ज्यूपिटर नोटबुक वातावरण प्रदान करता है जो इलम प्लेटफॉर्म के साथ कसकर एकीकृत है। यह कई उपयोगकर्ताओं को कुबेरनेट्स क्लस्टर पर लॉग इन करने और अपने स्वयं के पृथक ज्यूपिटर उदाहरणों को जन्म देने की अनुमति देता है, सभी एक केंद्रीय ज्यूपिटरहब सेवा द्वारा प्रबंधित किए जाते हैं। एक स्टैंडअलोन के विपरीत ज्यूपिटरलैब (जो नोटबुक के लिए एकल-उपयोगकर्ता वेब-आधारित आईडीई है), JupyterHub एक के रूप में कार्य करता है बहु-उपयोगकर्ता ऑर्केस्ट्रेशन परत. लॉग इन करने वाले प्रत्येक उपयोगकर्ता को क्लस्टर के अंदर चलने वाला एक समर्पित JupyterLab सर्वर (उनका व्यक्तिगत कार्यक्षेत्र) मिलता है, जबकि JupyterHub प्रमाणीकरण, स्पॉनिंग और संसाधन प्रबंधन को केंद्रीय रूप से संभालता है। इसका मतलब है कि डेटा विज्ञान टीमें एक सामान्य बुनियादी ढांचा साझा कर सकती हैं लेकिन फिर भी अलग नोटबुक वातावरण में काम करती हैं।
JupyterHub Ilum के अंदर की प्रमुख विशेषताओं में शामिल हैं:
-
बहु-उपयोगकर्ता समर्थन: उपयोगकर्ता प्रमाणित करते हैं (एलडीएपी क्रेडेंशियल्स के माध्यम से) और प्रत्येक को कुबेरनेट्स पॉड में चलने वाला एक अलग ज्यूपिटर कार्यक्षेत्र प्राप्त होता है। JupyterHub इन उपयोगकर्ता पॉड्स का प्रबंधन करता है और सुनिश्चित करता है कि वे सुरक्षित रूप से अलग हो गए हैं। यह स्थानीय ज्यूपिटर इंस्टॉलेशन की आवश्यकता को समाप्त करता है और संगठनों को एक ही स्थान पर कई उपयोगकर्ताओं के लिए नोटबुक होस्ट करने देता है।
-
स्पार्क एकीकरण: Ilum’s JupyterHub comes pre-integrated with Apache Spark. Each environment is configured with स्पार्कमैजिक और के माध्यम से इलम स्पार्क क्लस्टर से जुड़ता है इलम लिवी-प्रॉक्सी सेवा। इसका मतलब है कि आप स्पार्कमैजिक मैजिक (
%manage_spark,%%स्पार्क) to create and manage Spark sessions. The Spark jobs execute on the cluster (not on the notebook container), leveraging Ilum’s interactive Spark session backend. By using Ilum’s Livy-compatible API, Jupyter can run heavy Spark computations while offloading the work to the Spark cluster, seamlessly integrating big data processing into your notebooks. -
Gitea के साथ अंतर्निहित संस्करण नियंत्रण: Every user’s notebook workspace is backed by a personal Git repository on Ilum’s integrated Gitea service. On first login, a repository is automatically created and initialized with template notebooks and directory structure. Users can version their code, track changes, and collaborate by pushing commits to this repo. This Git integration is unique to Ilum’s JupyterHub setup – it ensures that notebook content isn’t just saved on a disk, but is also version-controlled and accessible through a Git web interface.
-
मानक JupyterLab से अंतर: From an end-user perspective, working in JupyterHub’s interface will feel the same as regular JupyterLab (you can write code, execute cells, install packages, etc.). However, under the hood JupyterHub adds enterprise features: केंद्रीय प्रमाणीकरण, बहु-उपयोगकर्ता अलगाव, साझा संसाधन प्रबंधनऔर अन्य इलम के साथ एकीकरण सेवाएँ. In Ilum, JupyterHub is not just an editor – it’s part of a larger ecosystem that includes LDAP-based access control, shared Spark clusters, and DevOps-managed infrastructure. This contrasts with a standalone JupyterLab where you operate on local resources with a single user context. In summary, JupyterLab यूजर इंटरफेस हैजबकि JupyterHub is the service that makes it multi-user and connected to Ilum’s cluster resources.
स्थापत्यशैली
इलम में JupyterHub एकीकरण की वास्तुकला।
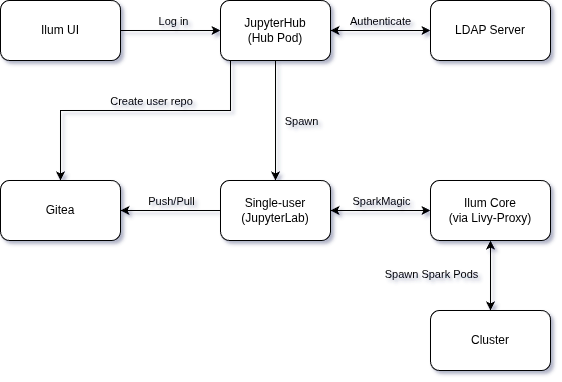
ऊपर दिया गया आरेख दिखाता है कि इलम में JupyterHub विभिन्न घटकों से कैसे जुड़ता है:
-
JupyterHub सेवा (हब पॉड): केंद्रीय हब कुबेरनेट्स क्लस्टर में इलम के हिस्से के रूप में चलता है। इसमें JupyterHub प्रक्रिया और एक कस्टम शामिल है गिटिया ऑपरेटर JupyterHub के अंदर। हब उपयोगकर्ताओं को प्रमाणित करने के लिए LDAP का उपयोग करने के लिए कॉन्फ़िगर किया गया है, और उपयोगकर्ता नोटबुक सर्वर ऑन-डिमांड spawns है।
-
एकल-उपयोगकर्ता सर्वर (JupyterLab पॉड): When a user logs in, JupyterHub launches a dedicated pod running a single-user Jupyter server for that user. Users interact with this Jupyter interface to run notebooks. Each user pod is isolated and has access only to that user’s data (including their Git repo and any persistent volume for notebooks).
-
LDAP सर्वर (प्रमाणीकरण और प्राधिकरण): JupyterHub को उपयोगकर्ता प्रमाणीकरण के लिए एक बाहरी LDAP निर्देशिका (या Ilum के साथ तैनात LDAP सेवा) की आवश्यकता होती है। जब कोई उपयोगकर्ता JupyterHub में लॉग इन करने का प्रयास करता है, हब उपयोगकर्ता नाम और पासवर्ड को सत्यापित करने के लिए कॉन्फ़िगर किए गए LDAP सर्वर के साथ संचार करता है। केवल वे उपयोगकर्ता जो LDAP प्रमाणीकरण पास करते हैं (और यदि सेट हैं, तो कुछ समूह सदस्यता मानदंडों को पूरा करते हैं) को अनुमति दी जाती है। वास्तव में, LDAP Ilum सेवाओं में उपयोगकर्ता की पहचान और क्रेडेंशियल्स के लिए सत्य के एकल स्रोत के रूप में कार्य करता है।
-
Gitea Git सेवा (संस्करण नियंत्रण): Ilum includes an internally hosted Git service (Gitea). JupyterHub’s गिटिया ऑपरेटर monitors the cluster for events such as new user pods starting. On a user’s first login, the operator uses Gitea’s API to एक गिट भंडार और टीम का प्रावधान करें for the user. The user’s notebook pod will then perform an initialization sync: it uses Git (over HTTP) to pull in template notebooks from the new repo. This sync uses the user’s LDAP credentials or a configured service account to authenticate to Gitea. After initialization, the user’s environment has a checked-out copy of their repository (with starter notebooks in place), and any changes the user makes can be committed and pushed back to Gitea. (Details in Gitea एकीकरण नीचे अनुभाग।
-
इलम कोर सर्विसेज (लिवी-प्रॉक्सी एपीआई): Ilum's core (the central management component of Ilum) provides an API for interactive Spark sessions, exposed via the इलम-लिवी-प्रॉक्सी service. Jupyter notebooks communicate with this service when the user runs Spark code. The Sparkmagic extension in Jupyter is preconfigured with an endpoint pointing to the Livy-proxy (
http://ilum-core:9888internally). When a user creates a Spark session from the notebook, Sparkmagic contacts Ilum's Livy-proxy, which in turn instructs Ilum Core to launch a Spark driver (and executors) for that user's session. The Spark jobs then run on the स्पार्क क्लस्टर. Ilum Core manages these Spark pods and links them to the user's context. In practice, this means a user can click "Create Spark Session" in Jupyter and behind the scenes a full Spark context is provisioned on the cluster – all without leaving the notebook interface. -
इलम यूआई और अन्य सेवाएं: JupyterHub को एक मॉड्यूल के रूप में Ilum UI में एकीकृत किया गया है। उदाहरण के लिए, Ilum वेब इंटरफ़ेस से, आप नेविगेट कर सकते हैं JupyterHub > मॉड्यूल to open JupyterHub. The Ilum UI can optionally proxy to JupyterHub so that users who are already logged into Ilum can quickly reach the Jupyter interface. (By default, JupyterHub has its own login page and session management distinct from the Ilum UI – though using the same LDAP backend for credentials.)
संक्षेप में, इलम में JupyterHub के चौराहे पर बैठता है प्रमाणीकरण (LDAP), डेटा & कोड (गीता)और कंप्यूट (इलम कोर के माध्यम से स्पार्क). आर्किटेक्चर सुनिश्चित करता है कि जब कोई उपयोगकर्ता नोटबुक प्रारंभ करता है: वे एक केंद्रीय निर्देशिका के विरुद्ध मान्य होते हैं, संस्करण नियंत्रण के साथ उपयोग के लिए तैयार नोटबुक वातावरण दिया जाता है, और वितरित कंप्यूटिंग शक्ति के लिए एक-क्लिक पहुँच होती है।
LDAP प्रमाणीकरण और प्राधिकरण
Ilum’s JupyterHub uses एलडीएपी प्रमाणीकरण (उपयोगकर्ता क्रेडेंशियल्स सत्यापित करना) और प्राधिकरण (यह नियंत्रित करना कि कौन सेवा तक पहुंच सकता है) दोनों के लिए। इसका मतलब है कि उपयोगकर्ताओं के पास कॉन्फ़िगर की गई LDAP निर्देशिका में एक खाता होना चाहिए, और JupyterHub होगा LDAP से बाइंड करें लॉगिन समय पर उपयोगकर्ता नाम/पासवर्ड की जांच करने के लिए। इलम में एलडीएपी एकीकरण कैसे स्थापित किया जाता है, इसके कुछ महत्वपूर्ण पहलू हैं:
-
LDAP आवश्यक है: तुम LDAP सर्वर कॉन्फ़िगर किया गया होना चाहिए for JupyterHub to function in Ilum. Ilum does not support JupyterHub with simple internal accounts or OAuth at this time – the hub is tightly integrated with LDAP for consistency with enterprise deployments. If you don’t already have an LDAP server, you can deploy one (for example, an OpenLDAP instance) as part of your Kubernetes environment. In fact, Ilum’s Helm charts allow you to deploy a test OpenLDAP as a dependency in non-production setups. See the LDAP Security documentation for a comprehensive guide to setting up LDAP, including sample LDIFs and Helm values.
-
LDAP के लिए हेल्म कॉन्फ़िगरेशन: LDAP के लिए सभी कनेक्शन विवरण और क्वेरी हेल्म मानों के माध्यम से प्रदान की जाती हैं। कम से कम, आपको सेट करना होगा:
- LDAP सर्वर URL(s) और आधार DN.
- एक बाइंड डीएन और पासवर्ड (यदि आपके एलडीएपी को खोज करने के लिए सेवा खाते की आवश्यकता है)।
- उपयोगकर्ताओं के लिए खोज आधार और फ़िल्टर, और उपयोगकर्ता नाम के रूप में उपयोग करने के लिए विशेषता।
- समूहों के लिए खोज आधार और फ़िल्टर (यदि समूह-आधारित प्रतिबंधों का उपयोग कर रहे हैं)।
उदाहरण के लिए, इलम में LDAP को सक्षम करने के लिए, आप अपने हेल्म अपग्रेड/इंस्टॉल कमांड में निम्न जैसे पैरामीटर शामिल कर सकते हैं (यह उदाहरण प्लेसहोल्डर मानों का उपयोग करता है):
हेल्म अपग्रेड --install इलम इलम / \
    --अस्त हो ilum-core.security.type="एलडीएपी" \
    --अस्त हो ilum-core.security.ldap.urls[0]="ldap://ilum-openldap:389" \
    --अस्त हो ilum-core.security.ldap.base="dc=ilum,dc=cloud" \
    --अस्त हो ilum-core.security.ldap.username="cn=admin,dc=ilum,dc=cloud" \
    --अस्त हो ilum-core.security.ldap.password="<bind-password>" \
    --अस्त हो ilum-core.security.ldap.userMapping.base="ऊ = लोग" \
    --अस्त हो ilum-core.security.ldap.userMapping.filter="यूआईडी = {0}" \
    --अस्त हो ilum-core.security.ldap.groupMapping.base="ou=groups" \
    --अस्त हो ilum-core.security.ldap.groupMapping.filter="(सदस्य = {0})"
उपरोक्त में, security.type="LDAP" switches Ilum to LDAP mode, and the other values supply the connection info and queries (UID filter, group filter, etc.). These should be adjusted to match your directory’s schema and structure.
-
अनुमत LDAP समूह: Typically, you may not want every LDAP user to use JupyterHub, so Ilum’s JupyterHub supports restricting access to specific groups. You can configure an अनुमत समूह JupyterHub LDAP प्रमाणक में सूची। यह एक या अधिक समूहों का पूर्ण डीएन प्रदान करके किया जाता है; केवल वे उपयोगकर्ता जो उन समूहों में से कम से कम एक के सदस्य हैं, लॉग इन करने में सक्षम होंगे। तकनीकी रूप से, हेल्म चार्ट सेट करता है
jupyterhub.hub.config.LDAPAuthenticator.allowed_groupsआपके द्वारा निर्दिष्ट समूह DNS के साथ पैरामीटर। उदाहरण के लिए, यदि आप केवलcn=datascientist,ou=subgroups,dc=ilum,dc=cloudJupyter तक पहुँचने के लिए, आप प्रदान करेंगे कि DN. JupyterHub तब यह सुनिश्चित करने के लिए LDAP क्वेरी करेगा कि लॉगिंग-इन उपयोगकर्ता एक्सेस की अनुमति देने से पहले उस समूह का सदस्य है। (यदि allowed_groups सेट नहीं है, तो कोई भी मान्य LDAP उपयोगकर्ता डिफ़ॉल्ट रूप से लॉग इन कर सकता है.) -
उपयोगकर्ता विशेषताओं का मानचित्रण: As part of LDAP integration, Ilum maps certain LDAP attributes onto the user’s Jupyter environment. For instance, the uid attribute is used as the JupyterHub username (and as the directory name for the user’s workspace). Attributes like पूरा नाम (जैसे cn या displayName) और ईमेल ( mail ) are pulled from LDAP and can be used for the user’s Git configuration and in the Ilum UI. Under the hood, Ilum’s configuration allows specifying which LDAP attributes correspond to Ilum user fields – e.g., mapping mail -> email, cn -> full name. When a user logs in, these mappings ensure that the Jupyter environment “knows” the user’s name and email. In practice, the JupyterHub spawner might set the Git client config inside the container using this info (so that any commits the user makes will carry their correct name/email). It also means the Ilum platform can show the proper identity for notebook servers.
The LDAP bind password and other credentials should be treated as sensitive secrets. It’s recommended to supply them via your Helm values (or a Kubernetes Secret) and नहीं उन्हें स्रोत नियंत्रण में जांचें। ऊपर दिया गया उदाहरण दृष्टांत के लिए --set ilum-core.security.ldap.password="psswd" दिखाता है, लेकिन वास्तविक परिनियोजन में आप एक सुरक्षित मान का उपयोग करेंगे। सुनिश्चित करें कि आपका LDAP कनेक्शन सुरक्षित है (उदाहरण के लिए, LDAPS का उपयोग करें और LDAPS कॉन्फ़िगरेशन के लिए Ilum दस्तावेज़ में दिखाए गए अनुसार उपयुक्त प्रमाणपत्र प्रदान करें)।
Finally, because JupyterHub is tightly coupled with LDAP in Ilum, if LDAP is not configured correctly, users will not be able to log in to notebooks. Always verify your LDAP settings by logging into the main Ilum UI first. Once Ilum core authentication via LDAP is confirmed working, JupyterHub should also be able to authenticate users (since it uses the same underlying config). If you need to troubleshoot JupyterHub LDAP issues, you can inspect the JupyterHub pod logs for authentication errors – it will typically log LDAP connection attempts and any filter mismatches.
For detailed LDAP configuration, see the LDAP Security documentation for comprehensive guidance on LDAP setup, including SSL/TLS configuration, attribute mapping, and synchronization options.
Gitea एकीकरण (संस्करण-नियंत्रित नोटबुक)
Ilum में JupyterHub की एक असाधारण विशेषता इसके साथ अंतर्निहित एकीकरण है गीता, Ilum’s lightweight Git service. This integration ensures that every user’s notebooks and code are version-controlled from the moment they start using Jupyter. Here’s how it works and what happens on a user’s first login:
-
प्रत्येक उपयोगकर्ता के लिए व्यक्तिगत गिट भंडार: पहले लॉगिन पर, Gitea ऑपरेटर (JupyterHub पॉड के अंदर चल रहा है) एक नया भंडार उपयोगकर्ता के लिए Gitea में। आमतौर पर, यह रेपो उपयोगकर्ता के लिए निजी होता है (हालांकि वे इसे बाद में साझा करना चुन सकते हैं)। भंडार एक विशेष गीता के तहत बनाया जा सकता है संगठन or namespace designated for Ilum notebooks, or simply under the user’s account – but in either case, it’s the user’s personal repository उनके ज्यूपिटर नोटबुक और फाइलों के लिए। संगठनात्मक स्पष्टता के लिए, ऑपरेटर एक संबंधित भी बनाता है टीम Gitea में और उपयोगकर्ता को इसे असाइन करता है, यह सुनिश्चित करता है कि केवल उस उपयोगकर्ता (और व्यवस्थापक) के पास नए भंडार तक पहुंच हो। वास्तव में, प्रत्येक उपयोगकर्ता को मिलता है उनकी अपनी टीम और रेपो on the Gitea server on first login (this is done to encapsulate permissions – e.g., the team could correspond to an Ilum Group or just serve to isolate access)
-
प्रारंभिक नोटबुक टेम्पलेट्स: इलम टेम्पलेट सामग्री के साथ नए रिपॉजिटरी को पूर्व-पॉप्युलेट कर सकता है। हेल्म चार्ट में ConfigMaps या टेम्प्लेट फ़ाइलें शामिल हैं जिनमें शामिल हैं स्टार्टर नोटबुक, निर्देशिका संरचना और कॉन्फ़िगरेशन फ़ाइलें जो नए उपयोगकर्ताओं के लिए उपयोगी हैं। उदाहरण के लिए, आपको एक
IlumIntro.ipynbनोटबुक, उदाहरण स्पार्क नोटबुक, या एक विशिष्ट फ़ोल्डर लेआउट जैसे ही आप लॉग इन करते हैं। ये फ़ाइलें कुबेरनेट्स कॉन्फ़िगमैप (हेल्म चार्ट में परिभाषित) से आती हैं और आरंभीकरण के दौरान JupyterHub वातावरण में कॉपी की जाती हैं। हब कागिट-इनिट-रेपोinit container will perform a Git commit to add these templates to the user’s repo on first setup.
First Login Workflow
जब कोई उपयोगकर्ता पहली बार JupyterHub में लॉग इन करता है:
-
ज्यूपिटरहब उपयोगकर्ता को LDAP के माध्यम से प्रमाणित करता है।
-
हब spawns the user’s notebook pod. यह पॉड एकल-उपयोगकर्ता ज्यूपिटर सर्वर को शुरू करता है।
-
इसके साथ ही, गिटिया ऑपरेटर ने की पहचान that a new Jupyter notebook pod was created (for a user that likely has no repo yet). It then calls the Gitea API (using a special admin account) to set up the repository and access rights for that user. (If the user does not yet exist in Gitea’s database, the operator may trigger the creation of the user account as well. In many cases, Gitea is configured with LDAP authentication too, so the user can use the same credentials on the Gitea web interface – but an initial entry might be created via API to attach them to the repo/team.)
-
एक बार रेपो बन जाने के बाद, एक init process in the user’s pod syncs the content. Typically, this involves setting up Git inside the notebook container and cloning the empty repository from Gitea into the user’s workspace, then copying the template files into it, git add/commit, and pushing back to Gitea.
In either case, the user’s LDAP credentials are used for the Git operation (so that the commit is attributed to the user and the push is authenticated). Since Gitea is running internally, the Helm chart knows the Gitea service address (e.g., ilum-gitea-http:3000 ) and uses the provided गिट उपयोगकर्ता नाम/पासवर्ड to perform the Git push. After this step, the user’s repository in Gitea is no longer empty – it contains the starter notebooks from the template. The user’s Jupyter file browser will show these files immediately, because they’ve been pulled into the pod’s filesystem. The user server finishes launching and the user can now interact with the notebook UI. From their perspective, they see a pre-populated workspace and can begin working with the provided examples or create new notebooks.
चल रहे उपयोग और सिंक: पहली बार आरंभीकरण के बाद, भंडार उपयोगकर्ता का है। वहां है टेम्प्लेट से कोई निरंतर-मजबूर सिंक नहीं – the templates are applied only once. Users are expected to use Git to manage their work going forward. This means any new notebooks they create or changes they make are not automatically pushed to Gitea unless they commit and push. Ilum’s JupyterLab comes with the JupyterLab Git एक्सटेंशन स्थापित (साइडबार में गिट आइकन के माध्यम से सुलभ), जो ज्यूपिटर इंटरफ़ेस के भीतर परिवर्तन करना और पुश/पुल करना आसान बनाता है। उपयोगकर्ता ज्यूपिटर में एक टर्मिनल भी खोल सकते हैं और मैन्युअल रूप से गिट कमांड का उपयोग कर सकते हैं। दूरस्थ मूल पहले से ही Ilum Gitea सर्वर पर उनके व्यक्तिगत भंडार को इंगित करने के लिए कॉन्फ़िगर किया गया है।
सहयोग करना और साझा करना: By default, each user’s repo is private to them (plus any Ilum admin). If a user wants to share a notebook, they can Gitea के माध्यम से पहुँच प्रदान करें (उदाहरण के लिए, किसी सहयोगी को उनके रेपो या निर्यात नोटबुक में आमंत्रित करें)। गिट के इस तंग एकीकरण का मतलब है कि कोड समीक्षा और संस्करण ट्रैकिंग जैसे सर्वोत्तम प्रथाओं को नोटबुक पर लागू किया जा सकता है।
भंडार संरचना: आरंभीकृत रेपो की सटीक संरचना को हेल्म मानों (ConfigMaps का उपयोग करके या कस्टम ज्यूपिटर छवि का निर्माण करके) के माध्यम से अनुकूलित किया जा सकता है। सामान्य पैटर्न नमूना नोटबुक (जैसे, काम / ) के लिए एक फ़ोल्डर शामिल करना है। यह नए उपयोगकर्ताओं को मार्गदर्शन देता है और पूरे संगठन में एक सुसंगत परियोजना संरचना सुनिश्चित करता है।
उपयोगकर्ताओं के लिए सुझाव:
आपके पहले लॉगिन के बाद, आपका नोटबुक सर्वर पहले से ही गिट रिपॉजिटरी से जुड़ा हुआ है।When you click the “Save” button in Jupyter, your changes are saved only to your personal persistent storage (PVC) on the cluster. इसका अर्थ है कि सभी संपादन और नई नोटबुक्स आपके कार्यस्थान में उपलब्ध रहती हैं, भले ही आपका सर्वर पुनरारंभ हो, जब तक कि आपका उपयोगकर्ता डेटा हटाया न जाए.
यदि आप अपने गिट रिपॉजिटरी (गिटिया पर होस्ट किया गया) में अपने परिवर्तनों का बैकअप लेना चाहते हैं या उन्हें दूसरों के साथ साझा करना चाहते हैं, तो आपको ज्यूपिटरलैब में गिट एकीकरण का उपयोग करना होगा:
- गिट पैनल खोलें (बाएं साइडबार पर)।
- परिवर्तनों को चरण दें, एक प्रतिबद्ध संदेश जोड़ें, और अपना काम करें।
- Click “Push” to upload your commits to the central Git server.
याद करना: केवल उन फ़ाइलों को जो प्रतिबद्ध हैं और गिट में धकेल दी गई हैं, उन्हें आपके भंडार में सहेजा जाएगा और गीटा पर बैकअप लिया जाएगा। यदि आपका नोटबुक सर्वर कभी भी हटा दिया जाता है या आपको अपने परिवेश को पुनर्स्थापित करने की आवश्यकता होती है, तो आप हमेशा गिट रिपॉजिटरी से अपने नवीनतम कमिट खींच सकते हैं। गिट का उपयोग करने से आप अपनी नोटबुक के पुराने संस्करणों पर वापस जा सकते हैं और शाखाओं या पुल अनुरोधों के माध्यम से दूसरों के साथ सहयोग कर सकते हैं।
संक्षेप में, Ilum में Gitea एकीकरण आपके Jupyter कार्यक्षेत्र को गेट-गो से संस्करण-नियंत्रित प्रोजेक्ट रिपॉजिटरी में बदल देता है। यह प्रजनन क्षमता और सहयोग को प्रोत्साहित करता है, और यह इसके साथ संरेखित होता है गिटऑप्स principles (even for notebooks). Data scientists can treat notebooks as code – committing changes, writing commit messages, and using branches or pull requests for major updates – all while staying within the comfortable Jupyter environment.
हेल्म के माध्यम से JupyterHub को तैनात करना (कॉन्फ़िगरेशन और रहस्य)
में helm aio chart, ilum-jupyterhub है disabled by default. You must explicitly enable it and configure एलडीएपी for it to function.
To successfully deploy JupyterHub, you must enable the service and configure the LDAP connection details for both Ilum Core and Gitea.
1. Enable and Configure LDAP
You must provide your LDAP server details. If you do not have an existing LDAP server, you can enable the bundled OpenLDAP service (which is also disabled by default) for testing purposes.
उदाहरण मान.yaml configuration:
# 1. Enable the bundled OpenLDAP service (for testing/demo only)
ओपनएलडीएपी:
  सक्षम: सच्चा

# 2. Configure Ilum Core to use LDAP
इलम कोर:
  प्रतिभूति:
    प्रकार: "एलडीएपी"
    एलडीएपी:
      # URL of your LDAP server (or the bundled one)
      यूआरएल:
        - एलडीएपी://ilum-ओपनएलडीएपी:389
      नींव: "dc=ilum,dc=cloud"
      उपयोगकर्ता नाम: "cn=admin,dc=ilum,dc=cloud"
      पासवर्ड: "Not@SecurePassw0rd" # Change this!
      # User search settings
      उपयोगकर्ता मैपिंग:
        नींव: "ऊ = लोग"
        छानना: "यूआईडी = {0}"
      # Group search settings
      समूहमानचित्रण:
        नींव: "ou=groups"
        छानना: "(सदस्य = {0})"

# 3. Enable JupyterHub
ilum-jupyterhub:
  सक्षम: सच्चा

# 4. Configure Gitea with LDAP (Required for notebook storage)
गीता:
  सक्षम: सच्चा
  गीता:
    एलडीएपी:
      - नाम: "LDAP"
        securityProtocol: "unencrypted"
        मेज़बान: "ilum-openldap"
        बंदरगाह: 389
        bindDn: "cn=admin,dc=ilum,dc=cloud"
        bindPassword: "Not@SecurePassw0rd"
        userSearchBase: "ou=people,dc=ilum,dc=cloud"
        userFilter: "(uid=%s)"
        adminFilter: "(uid=ilumadmin)"
        usernameAttribute: "यूआईडी"
        surnameAttribute: "sn"
        emailAttribute: "मेल"
        synchronizeUsers: सच्चा
    कॉन्फिग:
      cron:
        sync_external_users:
          सक्षम: "सच"
          RUN_AT_START: सच्चा
          NOTICE_ON_SUCCESS: सच्चा
          SCHEDULE: "@every 5m"
          UPDATE_EXISTING: सच्चा
वही cron.sync_external_users configuration is आवश्यक when using LDAP authentication with Gitea. This cron job automatically synchronizes user information from your LDAP directory to Gitea every 5 minutes.
महत्वपूर्ण: वही RUN_AT_START: true setting is critical. Without this initial synchronization, operators (such as the Gitea Operator) will not have access to Gitea, preventing them from creating repositories or managing permissions for new users.
This configuration ensures that:
- New LDAP users are automatically created in Gitea when they first access JupyterHub
- User attributes (name, email) are kept in sync with LDAP
- User access is updated based on LDAP group membership changes
When upgrading Ilum or changing JupyterHub configurations, please note that running user notebook pods are NOT automatically restarted. To apply changes (such as new images, secrets, or environment variables), users must stop and restart their servers manually (via the JupyterHub control panel), or an administrator must explicitly restart them.
Enterprise Image Access
The Ilum Enterprise license grants access to private Docker repositories containing the optimized JupyterHub images required for the platform. To use these images, you must configure a Kubernetes secret to authenticate with the registry.
You can configure ilum-jupyterhub to automatically create this secret using your credentials:
ilum-jupyterhub:
  imagePullSecret:
    create: सच्चा
    # The registry URL provided with your license
    registry: "registry.ilum.cloud"
    # Your enterprise username
    उपयोगकर्ता नाम: "my-enterprise-user"
    # Your enterprise password/token
    पासवर्ड: "my-secret-token"
    ईमेल: "[ईमेल संरक्षित]"
Alternatively, if you have already created a secret in your namespace (e.g., my-reg-cred), you can reference it:
ilum-jupyterhub:
  imagePullSecret:
    create: गलत
    नाम: "my-reg-cred"
    automaticReferenceInjection: सच्चा
Advanced JupyterHub Configuration
While the basic configuration enables the service, ilum-jupyterhub offers granular control over its integrations.
JupyterHub Specific LDAP
By default, JupyterHub can share the global LDAP settings, but you can also configure it independently if needed. This is useful if JupyterHub users are in a different directory or require different search filters.
ilum-jupyterhub:
  एलडीएपी:
    सक्षम: सच्चा
    यूआरएल:
      - एलडीएपी://ilum-ओपनएलडीएपी:389
    नींव: "dc=ilum,dc=cloud"
    उपयोगकर्ता नाम: "cn=admin,dc=ilum,dc=cloud"
    पासवर्ड: "Not@SecurePassw0rd"
    व्यवस्थापकउपयोगकर्ता:
      - ilumadmin
      - शासन
    userSearchBase: "ou=people,dc=ilum,dc=cloud"
    userSearchFilter: "यूआईडी = {0}"
    groupSearchBase: "ou=groups,dc=ilum,dc=cloud"
    groupSearchFilter: "(सदस्य = {0})"
    allowedGroups: []
    userAttribute: "यूआईडी"
    fullnameAttribute: "सीएन"
    emailAttribute: "मेल"
    groupNameAttribute: "सीएन"
    groupMemberAttribute: "member"
    useSsl: गलत
    startTls: गलत
    lookupDn: सच्चा
Gitea Connection Settings
वही गिट section in ilum-jupyterhub controls how the Hub connects to Gitea to provision repositories. This is pre-configured in helm aio to use the internal Gitea, but can be customized.
ilum-jupyterhub:
  गिट:
    existingSecret: इलम-गिट-प्रत्यय-पत्र
    ईमेल: ilum@ilum
    कोष: बृहस्पति
    address: "ilum-gitea-http:3000"
    यूआरएल: "http://ilum-gitea-http:3000"
    orgName: "ilum-jupyterhub"
    operatorImage:
      नाम: docker.ilum.cloud/ilum-jupyterhub
      टैग: गीता-संचालक-4.3.1
    रहस्य:
      नाम: इलम-गिट-प्रत्यय-पत्र
      usernameKey: उपयोगकर्ता नाम
      passwordKey: पासवर्ड
SSH Access to Notebook Servers
Ilum's JupyterHub packaging includes SSH access to single-user notebook pods, enabling power users to connect remotely via SSH for advanced workflows like VS Code Remote development, direct terminal access, or file synchronization. This feature is disabled by default.
For a complete guide on connecting VS Code to Jupyter pods via SSH, see the VS Code Jupyter Integration Guide.
SSH Architecture
SSH access is opt-in and requires external Kubernetes Secrets containing host keys and authorized user keys. These secrets must be created outside of Helm to ensure host fingerprints remain stable across upgrades.
The SSH implementation supports two modes:
गुरूमोड समूह (default): All users share a singleauthorized_keysfile from one Kubernetes Secret. One NodePort Service provides SSH access to all user pods.perUserमोड समूह: Each user has a dedicated Secret (e.g.,ssh-keys-{username}) with their ownauthorized_keys. The SSH operator creates a separate NodePort Service for each user, providing isolated SSH endpoints.
Step 1: Generate SSH Keys
Create host keys (RSA, ECDSA, ED25519) and an authorized_keys file containing public keys of users who may SSH into notebook pods.
ssh-keygen -t rsa -b 4096 -N '' -स्त्री-विषयक ssh_host_rsa_key
ssh-keygen -t ecdsa -b 521 -N '' -स्त्री-विषयक ssh_host_ecdsa_key
ssh-keygen -t ed25519 -N '' -स्त्री-विषयक ssh_host_ed25519_key
# For master mode: combine all user public keys
cat user1.pub user2.pub > authorized_keys
Store these files securely. The host key fingerprints must remain constant between releases, or SSH clients will show host-key warnings on every connection.
Step 2: Create Kubernetes Secret
के लिए गुरू mode:
Create a single secret containing host keys and the shared authorized_keys:
kubectl create secret generic ilum-jupyterhub-ssh-keys \
  --from-file=ssh_host_rsa_key=ssh_host_rsa_key \
  --from-file=ssh_host_ecdsa_key=ssh_host_ecdsa_key \
  --from-file=ssh_host_ed25519_key=ssh_host_ed25519_key \
  --from-file=authorized_keys=authorized_keys
के लिए perUser mode:
Create one secret per user following the naming template ssh-keys-{username} (configurable via ssh.perUserSecretNameTemplate):
# Example for user "alice"
kubectl create secret generic ssh-keys-alice \
  --from-file=authorized_keys=alice_authorized_keys
The SSH operator sidecar automatically provisions NodePort Services for every user secret it discovers, enabling per-user SSH endpoints.
Step 3: Enable SSH in Helm Configuration
Add the following to your मान.yaml before installing or upgrading:
ilum-jupyterhub:
  ssh:
    सक्षम: सच्चा
    मोड समूह: गुरू  # or "perUser" for per-user secrets and services
    keysSecret: इलम-jupyterhub-ssh-keys
    सेवा:
      प्रकार: नोडपोर्ट
      बंदरगाह: 2222
      नोडपोर्ट: ""  # Kubernetes will auto-assign if empty
    sshdConfig:
      customConfig:
        - "StrictModes no"  # Required due to Kubernetes volume permissions
    operatorImage:
      नाम: docker.ilum.cloud/ilum-jupyterhub
      टैग: ssh-संचालक-4.3.1
    extraEnv:
      - नाम: SSH_IDLE_TIMEOUT
        मूल्य: "3600"  # Optional: terminate idle SSH sessions after 1 hour
StrictModes no: Required because Kubernetes-mounted volumes may have relaxed permissions (e.g.,0777), which SSH's defaultStrictModes yeswould reject.मोड समूह: Controls whether a sharedauthorized_keys(गुरू) or per-user secrets/services (perUser) are used.extraEnv: Optional environment variables for the SSH operator sidecar.
JupyterHub के अंदर Gitea ऑपरेटर (DevOps विवरण)
For cluster administrators and maintainers, it’s useful to understand the implementation of the गिटिया ऑपरेटर जो JupyterHub के साथ चलता है। यह घटक वह है जो नए उपयोगकर्ताओं के लिए गिट रिपॉजिटरी प्रावधान को स्वचालित करता है:
-
यह क्या है? Gitea ऑपरेटर एक छोटा कुबेरनेट्स ऑपरेटर (नियंत्रक) है जिसे के साथ बनाया गया है कोफ फ्रेमवर्क (कुबेरनेट्स ऑपरेटर पायथनिक फ्रेमवर्क)। यह JupyterHub पॉड के हिस्से के रूप में चलता है (एक अलग तैनाती के रूप में नहीं)। संक्षेप में, जब JupyterHub कंटेनर शुरू होता है, तो यह ऑपरेटर प्रक्रिया (पायथन में लिखी गई) भी लॉन्च करता है जो कुबेरनेट्स एपीआई सर्वर और गिटिया एपीआई से जुड़ता है।
-
यह क्या देखता है? यह सुनता है JupyterHub से संबंधित कार्यक्रम – specifically, it can watch for the creation of user notebook pods or Hub events via the JupyterHub API. A common design is to watch for Kubernetes Pods with a certain label (for example, label like component=singleuser-server or an annotation that JupyterHub adds for user pods). When it detects a new pod for a given user, it interprets that as “User X has logged in and their server is starting up.”
-
रेपो/टीम निर्माण: ऐसी घटना पर, ऑपरेटर के साथ बातचीत करेगा Gitea’s REST API यह सुनिश्चित करने के लिए कि उपयोगकर्ता के पास आवश्यक गिट संसाधन हैं:
-
यह हो सकता है एक गीता बनाएं उपयोगकर्ता खाता for the logging-in user if one doesn’t exist. (If Gitea is configured to use LDAP authentication, the account might be auto-created on first login instead; the operator’s behavior might vary depending on config. In many cases, the user account in Gitea will be created the first time the user pushes or logs in to Gitea, so the operator might not explicitly create the user.)
-
यह होगा एक टीम और / या संगठन बनाएं to logically contain the user’s repo. For example, Ilum might have a global organization (like ilum-jupyterhub) and the operator will create a team within that org named after the user. The purpose of this is to manage repository permissions in Gitea. The team will include the user (linking their Gitea account) and possibly no one else (for a personal repo scenario). The operator uses the Gitea admin credentials (from ilum-jupyter.git.username/password ) to perform these actions via the API.
-
अगला, यह एक रिपॉजिटरी बनाता है उपयोगकर्ता के लिए Gitea में। पहले के कॉन्फ़िगरेशन से हम जानते हैं कि डिफ़ॉल्ट रेपो नाम पैटर्न क्या है?
jupyterhub-{username}. ऑपरेटर इस रेपो (फिर से Gitea API के माध्यम से) बनाएगा, इसके स्वामित्व को उपयुक्त उपयोगकर्ता/टीम के लिए निर्धारित करेगा, और शायद इसे इनिशियलाइज़ करेगा। -
यह तो अनुमतियाँ असाइन करता है – for instance, if using an organization, it ensures the created team has write access to the new repository and that the user is in that team. This way the user (when authenticated to Gitea) can read/write their repo, but others cannot (unless added). All these steps happen within a few seconds after the pod start event.
-
-
इन-क्लस्टर ऑपरेशन: Since the operator runs inside the JupyterHub pod, it has network access to the Gitea service (internal cluster address) and to the Kubernetes API via a service account. It’s scoped only to the namespace of Ilum (it will watch for pods in that namespace). It doesn’t deploy any CRD – it is likely just watching built-in resources like Pod or Secret events. This means you won’t see a separate deployment for “gitea-operator”; it’s embedded. This design simplifies deployment but means if the JupyterHub pod is down, the operator is down too.
-
लॉगिंग और डिबगिंग: For DevOps, if a user’s repository isn’t getting created or the templates don’t sync, the first place to check is the JupyterHub pod’s logs. The operator typically logs its actions (e.g., “Creating Gitea repo for user X”, or errors if API calls fail). Common issues might be misconfigured credentials (e.g., wrong git password, so it can’t auth to Gitea – in such a case, you’d see a 401/403 error in the logs), or Gitea not being reachable. Also, if the user’s LDAP password contains special characters or if the operator passes it incorrectly for Git clone, there could be URL encoding issues (so ensure no problematic chars or handle them). These are things to consider when debugging.
-
Kopf ऑपरेटर मूल बातें: Since it uses Kopf, the operator is likely defined by a Python function decorated to react to events. Kopf handles the boilerplate of watching and scheduling the function on events. This choice makes it easier to extend the operator’s logic if needed (for example, one could modify it to create additional resources, or to clean up repos when users are removed – though automatic cleanup might not be implemented to avoid deleting user code).
This Gitea operator is primarily of interest to maintainers. Regular end users won’t see it (it’s entirely backend). However, it’s good to know it exists: any automation around Git repo creation is happening because of this component. If in the future you upgrade Ilum or Gitea, you should ensure the operator’s account still has the right permissions. For instance, if you change the Gitea admin password, update the Helm secret so that the operator continues to function.
In summary, the Gitea operator automates what would otherwise be a manual DevOps task (provisioning a Git repo for every user and linking it to their environment). It's a कुबेरनेट्स-देशी स्वचालन living inside the JupyterHub container. DevOps teams should include this in their mental model of the system: when a new user comes online in JupyterHub, there's an automated process creating repos and teams in Gitea to support that user. If something goes wrong in that process, it can affect the user experience (e.g., user's notebook might start but their Git repo isn't ready). Thus, keep an eye on those logs during initial setup or after major changes.
उपयोगकर्ताओं के लिए पहली बार लॉगिन गाइड
यह खंड उन अंतिम उपयोगकर्ताओं के लिए एक त्वरित मार्गदर्शिका प्रदान करता है जो पहली बार Ilum में JupyterHub तक पहुंच रहे हैं।
JupyterHub तक पहुँचना: अपने SSO क्रेडेंशियल्स के साथ Ilum UI में लॉग इन करने के बाद, आपको स्वचालित रूप से अपने व्यक्तिगत JupyterHub सर्वर तक पहुंच प्रदान की जानी चाहिए। शुरू करने के लिए, पर जाएं JupyterHub > मॉड्यूल in the Ilum interface. This should open your JupyterHub environment directly—without requiring a separate login.
समस्या निवारण पहुँच:
- If, after logging in to Ilum, you are not automatically redirected to your Jupyter server, or you see the JupyterHub login page—something may be misconfigured.
- उस स्थिति में, JupyterHub पेज पर लॉग इन करने का प्रयास करें समान SSO (Ilum) क्रेडेंशियल आपने इलम के लिए ही इस्तेमाल किया।
- यदि आप अभी भी लॉग इन नहीं कर सकते हैं, या बार-बार क्रेडेंशियल के लिए कहा जाता है, तो कृपया इस समस्या की रिपोर्ट अपने इलम व्यवस्थापक को करें।
- आपको ज्यूपिटर एक्सेस के लिए आवश्यक समूह सदस्यता की भी कमी हो सकती है (जैसे,
ज्यूपिटर-उपयोगकर्तानहीं तोडेटा-वैज्ञानिक). आपका व्यवस्थापक आवश्यकतानुसार सत्यापित कर सकता है और एक्सेस प्रदान कर सकता है.
केवल अधिकृत उपयोगकर्ता (जैसा कि LDAP या निर्देशिका समूह सदस्यता द्वारा निर्धारित किया गया है) JupyterHub तक पहुंच सकते हैं। यदि आपको पहुँच निषेध है, लेकिन आपके SSO क्रेडेंशियल्स Ilum में कहीं और मान्य हैं, तो अनुमतियों के संबंध में अपने व्यवस्थापक से जाँच करें।
अपना नोटबुक सर्वर प्रारंभ करना: After a successful login, you will see a message like “Starting your server” or be redirected to a spawning page. JupyterHub is now launching your personal notebook server within the cluster. This can take ~ 30 सेकंड से कुछ मिनट तक, especially if it’s your first time (the system might be initializing storage, creating your Git repository, and pulling container images). Please be patient – this happens only on first startup or after the service has been idle for a long time. If the process takes too long or errors, you might see a log or an error page – in such cases, try refreshing after a minute. Usually, though, you will automatically land in the Jupyter interface once the server is ready.
ज्यूपिटरलैब इंटरफ़ेस: एक बार आपका सर्वर चलने के बाद, आपका ब्राउज़र खुल जाएगा ज्यूपिटरलैब interface. This is a web-based IDE where you can create notebooks, write code, open a terminal, etc. On the left, you’ll see a file browser. You should notice some pre-existing folders or notebooks here – those are the स्टार्टर टेम्पलेट्स provided by Ilum. For example, you might see a “IlumIntro.ipynb” or a project folder structure. Feel free to open these notebooks to read the instructions or run the example code. They are meant to help you get started with using Spark and other features in Ilum. You can also create new notebooks by clicking the “+” icon or using the Launcher (which appears by default with options like “Python 3 (ipykernel)” or other kernels).
नोटबुक में स्पार्क का उपयोग करना: इलम में JupyterHub का एक प्रमुख लाभ नोटबुक से स्पार्क नौकरियां चला रहा है।
Ilum नोटबुक में Apache Spark चलाने के लिए विस्तृत वर्कफ़्लो वर्णित है यहाँ.
स्पार्क सत्र शुरू करने, समापन बिंदुओं को प्रबंधित करने और इलम में स्पार्क जादू का उपयोग करने के चरण-दर-चरण निर्देशों के लिए कृपया इस गाइड को देखें।
गिट (बचत नोटबुक) के साथ काम करना: याद रखें कि आपकी होम डायरेक्टरी वास्तव में गिटिया सर्वर से जुड़ी एक गिट रिपॉजिटरी है। कुछ उपयोग युक्तियाँ:
- When you create or modify files, a small badge on the Git icon (left sidebar) will indicate the number of changes. Click the Git icon to open the Git panel. You’ll see a list of changed files. You can stage and commit changes with a message all from this interface.
- तक करना परिवर्तन: गिट पैनल में एक प्रतिबद्ध संदेश टाइप करें और चेकमार्क आइकन (प्रतिबद्ध) पर क्लिक करें।
- तक धक्का देना सर्वर पर : ऊपर तीर आइकॉन पर क्लिक करें। पुश करने के बाद, आपका काम सर्वर पर सुरक्षित रूप से संग्रहीत हो जाता है। आप Ilum Gitea वेब इंटरफ़ेस पर जा सकते हैं (के माध्यम से पहुँचा जा सकता है Gitea > मॉड्यूल in Ilum UI) to see your repository. It should show your latest commit. The Git integration ensures you don’t lose work even if the notebook server is recycled.
शट डाउन और लॉग आउट करना:
- लॉग आउट करने से केवल आपको ज्यूपिटर सर्वर से डिस्कनेक्ट किया जाता है; यह करता है नहीं अपना नोटबुक सर्वर तुरंत रोकें या बंद करें.
- आपका नोटबुक सर्वर पृष्ठभूमि में तब तक चलता रहेगा जब तक कि निष्क्रियता की किसी अवधि के बाद सिस्टम द्वारा इसे स्वचालित रूप से निष्क्रिय नहीं कर दिया जाता (निष्क्रिय टाइमआउट आपके व्यवस्थापक द्वारा सेट किया जाता है).
- चेतावनी: खुली नोटबुक्स में कोई भी न सहेजा गया कार्य (जो गिट के लिए प्रतिबद्ध नहीं है या सहेजा गया है) खो गया यदि निष्क्रियता के कारण आपका सर्वर स्वचालित रूप से बंद हो जाता है।
- अगली बार जब आप लॉग इन करेंगे, तो आपका सर्वर पुनरारंभ हो जाएगा और आपकी फ़ाइलें लगातार संग्रहण (गिट और आपकी होम निर्देशिका) से पुनर्स्थापित हो जाएंगी, लेकिन सहेजे गए /
- सर्वोत्तम प्रक्रियाएं: लॉग आउट करने या लंबे समय तक दूर रहने से पहले हमेशा अपनी नोटबुक सहेजें और गिट में परिवर्तन करें।